Cannot read property ’embed’ of undefined – PowerBI

We wanted to embed a power BI report in our simple Angular app.

Microsoft provide an Angular module to do this which we plugged in.

Simple enough, it looked like it was all setup and should work but it simply would not display. Looking at a sample that does work we could see that an iFrame was not being generated by the directive.

In the console window was this error:

angular.js:13424 TypeError: Cannot read property ’embed’ of undefined    at PowerBiService.embed (https://ptadminportal.local/node_modules/angular-powerbi/dist/angular-powerbi.js:338:40)

The Issue

The included scripts were added in the wrong order. They needed to be this way around:

/app/lib/js/powerbi-client/dist/powerbi.js
/app/lib/js/angular-powerbi/dist/angular-powerbi.js

But the angular-powerbi script was first.

The Fix

Everyone’s setup is different and so the fix will likely be different but essentially you need to ensure your scripts are added in the correct order.

In our case we had a kind of hybrid Angular and MVC app and so we were using the BundleConfig.cs to bundle up the scripts. By default it was adding files in a a folder in string order, these two scripts were in the same folder and so they were added in the wrong dependency order.

So we simply added each of these files explicitly, ensuring the order was correct:

bundles.Add(new ScriptBundle("~/app/powerbi")
 .Include("~/app/lib/js/powerbi-client/dist/powerbi.js")
 .Include("~/app/lib/js/angular-powerbi/dist/angular-powerbi.js"));

Shout out to Miguel Saldarriaga for solving this 🙂


Requesting resource xyz failed because it is complex

Trying to set the background image (drawable) of a View programatically I ran into this ‘complex‘ error.

Weird…it’s just an id!

First, what worked…then a few things I tried that didn’t work…

What Worked

Logger.Debug(“Works!”);
TypedArray array = view.Context.ObtainStyledAttributes(Resource.Styleable.AppTheme);
var image = array.GetDrawable(Resource.Styleable.AppTheme_ic_action_dice1);
array.Recycle();
view.SetBackgroundDrawable(image);

Some explanation…

  1. view is a View type variable.
  2. AppTheme is the name of the theme defined in the attrs.xml file.
  3. The important thing to note here is the use of Resource.Stylable.
  4. I can’t directly reference the Drawable image because there are about 5 versions of the same image across the drawable-hdpi, drawable-ldpi etc folders. There is ONE entry in the attrs.xml file for each of the images (i.e. not one for each size), they are part of the theme.

So it seems to access the ‘correct’ resourceId of the Drawable, you have to first load up the theme ‘TypedArray’ and do a GetDrawable against that.

Makes sense now I finally figured out what the hell is going on but I couldn’t find any blogs to guide in the right direction, it was all trial and error…thus this post 🙂

What Caused the ‘Complex’ error?

I also tried the following which were dead ends…

1.
Logger.Debug(“Fails because too complex…”);
view.SetBackgroundResource(Resource.Attribute.ic_action_dice1);

2.
Logger.Debug(“Fails because not found…”);
view.SetBackgroundResource(Resource.Styleable.AppTheme_ic_action_dice1);
// Exception of type ‘Android.Content.Res.Resources+NotFoundException’ was thrown.

One – I thought the properties in Resource.Attribute would be what I needed. There was only one entry per image, that is essentially how I was setting my default (using background=”?attr/ic_action_dice1″ ) in the .axml layout file. But no, using that resource causes the complex error. Don’t know why…curious to know but no time to investigate…

Two – I thought that since Resource.Styleable.AppTheme_someImage was a valid resource to use, that I could make a call to SetBackgroundResource and directly use that resourceId. Can’t find it. Even though as you can see the resourceId is exactly the same as what works.

So it seems you DO need to create the Drawable first…then call SetBackgroundDrawable.

Not sure if that is a Xamarin limitation…seems to be, otherwise why does SetBackgroundResource exist?

Or maybe I’m doing something wrong still? If you are in the know here…please share 🙂


Tech Tips for non Techie Founders

So I should be working on my 3 min pitch right now but I foolishly thought “I’ll have a quick look on Twitter”, found this article on TechCrunch and now feel I may have something to contribute. So if you are a non technical founder I am writing this for you…

First of all I have to agree with the article, quality developers have quality jobs and salaries that you as a startup cannot come close to. Those of us who are attracted to the romance of the startup usually have a stack of our own ideas that we never get enough time to work on…so your idea would have to be mind blowing to drop those ideas and pursue yours.

Your idea is probably not that good.

Learn to Code

So the advice is to “learn to code, it’s not that hard”. Completely agree. Learning to code is easy…becoming good at it is hard.

One of my fellow founders on the Founder Institute course had zero technical knowledge yet on the weekend he taught himself how to write and put up the landing page for his site! OK so it won’t win any awards but it is still a champion effort given his starting point and it’s the kind of, “screw you guys, I’m going to build it myself” kind of attitude that will make him a successful founder in the end.

If he can do it…you can do it!

You don’t need to be a good coder, that will take you years (I’ve been coding for 12 years and still feel like there is so much to learn), you just need to be able to sticky tape together a rough and kinda working prototype, get your MVP up and running and validate your idea. Balsamiq looks like a good tool, like Sketchflow the sketch like interface allows you to focus on how the thing will work rather getting caught up on UI specifics…UI specifics are important but not in the early stages and they can be seriously time consuming.

As a founder of a tech start up you cannot have too much technical knowledge.

I know of a couple of start ups where the leaders lack of technical knowledge is definitely damaging their product and more importantly, team morale.

And it is not just about knowing how to code…it’s about have at least some understanding of the software development process. Keep in mind software is never finished, never bug free and never perfect. Oh and there is never enough time or budget to build all the features you want with the quality you need, be aware of the Iron Triangle.

Training

Where to learn? Pluralsight. High quality training videos, 10 hours free, then cheap monthly plans. I haven’t watched them but there are some ‘getting started’ type videos there. Many of the courses are geared towards Microsoft developer tools but there are iOS and Android courses as well.

Tools

Where to get the tools? BizSpark. All the tools (and more) you need for free for 3 years!

I primarily use MS tools, so best resources outside of that I’m not the guy to ask. The MS tools are awesome.

Outsourcing

So without a technical co-founder it is likely you will outsource development of some or all of your product. When you outsource development you are putting a large part of your future success in the hands of those developers and you do not have the necessary skills to know if the code that is being written is good or terrible. If you are spending thousands to get your product developed I would recommend paying someone you trust or a consultancy to do a code review, fairly early on. Just to make sure the code is of a reasonable standard.

Having said that, there is definitely an argument with Lean principles in mind that suggest, get it built as quickly and cheaply as possible, then if/when it is a success re-write it from scratch and get the quality right then…

I have outsourced some of my development work to someone I have worked with in the past. He was an awesome developer and has started his own web development company, Cyberplex Software. He doesn’t write the code himself, he outsources it but he has done the hard work to find and put together a team of quality developers and designers. I’d recommend at least getting a quote from them, the work I have asked them to do was well priced and they’re easy and professional to work with….and no I do not get any kind of kick back for promoting them, it is simply a service I honestly recommend and am using myself (because I simply don’t have time to build everything myself).

Summary

The tools these days are awesome, the training tools are awesome, so get out there and learn all can. Don’t let your lack of technical skills hold you back from turning your idea into a reality 🙂


NuGet packages folder

So yesterday I tweeted:

why doesn’t #NuGet allow me to specify where the ‘packages’ folder goes??

and @davidfowl from the team asked me a great question:

Why do you need that?

144 characters just ain’t enough so I figured a quick blog is the best way to answer.

I’ve been using NuGet for about 6 months or so and love the whole concept of picking what I want from a list and let it do the boring stuff (download, unzip, add references etc) is awesome, plus of course the uninstall works brilliantly.

One little thing concerned me but did not stop me from using it…after a while I noticed I had multiple ‘packages’ folders through my source.

Now what I have done for years with 3rd party libraries is put them into a ‘SharedComponents’ (or similarly named) directory which sits in my root Dev folder, easily accessible by all my projects. This means I have one place only where components are referenced. This means all of my projects have the same version, for me this is good (I know if you’re a big dev shop you may need different versions for different projects).

NuGet changed this, giving me a packages folder in ‘a few’ different places. This was not a problem until recently when I added Rx to a project using NuGet and then I started getting a weird ‘co-varient contravarient something’ error (I don’t remember the specifics of the error). The problem was that one of my shared projects was referencing a different (older) version of Rx (installed by NuGet) some time ago.

My fix was to go back to my ‘old school’ way of referencing the Rx .dlls, all projects pointing to the same dlls in the same folder. Worked immediately.

But that sucks. NuGet is a great concept and saves me plently of time, I should be able to and want to use NuGet but version issues is pretty much a show stopper for me, these problems usually surface as very obscure bugs that _can_ take alot of time to narrow down to the fact that there is a versioning problem.

So if I could specify where the ‘packages’ folder always ‘lives’ (ie override the default, which seems to be where the .sln file is?), then my versioning problem would no longer be a problem.

Another advantage is keeping source control of components to a minimum. With multiple ‘packages’ folders with multiple versions (often the same) of the same 3rd party components, all of these get stored in source control or the projects won’t build on a build box. Better to have one source….unless you have a compelling reason to keep multiple/different versions.

So for my usage it would be really helpful to be able to specify where the ‘packages’ folder lives 🙂 Anyone else agree/disagree…with reason?

ClickOnce – File Already Exists

The Problem

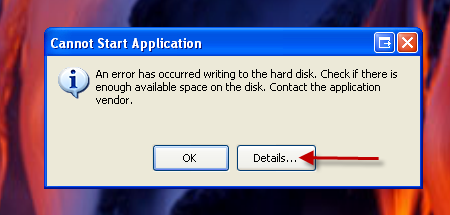
If your deploy a new version of your app and your users see “Cannot Start Application” when updating:

There could be many reasons, this quick post provides a few places to look to find what may be causing the File Already Exists problem.

Click on ‘Details’…and if your error looks something like this…then this most may help:

ERROR SUMMARY
	Below is a summary of the errors, details of these errors are listed later in the log.
	* Activation of ...\Start Menu\Programs\MyApp\MyApp\MyApp.appref-ms| resulted in exception. Following failure messages were detected:
		+ The file '...\Local Settings\Temp\Deployment\GOYP6PP3.TRR\61YND8Y2.Q2A\NaughtyFile.dll' already exists.

Where to look

Open up your ..\Application Files\MyApp1.0.0.0 directory (where 1.0.0.0 is the current build number)

Find and open the .manifest file, should be called MyApp.manifest.

Search for NaughtFile.dll (in the error above, NaughtyFile.dll was the name of the file that already exists), if your problem is the same as mine then you should find two references to this file in the manifest. In my case I had one reference which was a dependentAssembly and another which was a file.

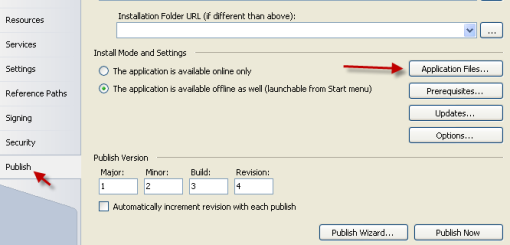
Now, the project you are publishing may not have a direct reference to a dll and yet it still appears in the list of dependentAssemblies because a project it references does directly reference the dll. The easiest way to check this list is to go to the project properties, Publish Tab and open Application Files…

From there you see the list of files that are included, but I’ve noticed sometimes the list is not 100% truthful, if weird stuff is happening, open your project file in Notepad and closely examine the list of included and excluded files.

Note that you can only exclude a file in this list if the project has a direct reference to the file (this may not be true, but I just tried it and it didn’t exclude and I don’t have time for further investigation).

So our trouble, our extra ‘file’ reference came from an extension to msBuild that we have to explicitly include certain files (needed if you need the dll but cannot add a reference for example), that looks a little like this….

  <ItemGroup>
    <AdditionalPublishFile Include="..\..\NaughtyFileLocation\*">
      <Visible>False</Visible>
    </AdditionalPublishFile>
....

By changing the explicit inclusion to ‘not’ include that specific file (we needed other files in that directory), our problem went away. The key is ensuring that your manifest only has one entry for each file that is included…the trick is figuring out why there are multiple entries!

Good luck!

file:///C:/Dev/Release/Master/PmsMasterBuild_2.0.1.11.7zERROR SUMMARY
	Below is a summary of the errors, details of these errors are listed later in the log.
	* Activation of C:\Documents and Settings\mark.wallis\Start Menu\Programs\PMS Smart Client\PMS Smart Client\PMS Smart Client.appref-ms| resulted in exception. Following failure messages were detected:
		+ The file 'C:\Documents and Settings\mark.wallis\Local Settings\Temp\Deployment\GOYP6PP3.TRR\61YND8Y2.Q2A\EcsLite.Downloader.dll' already exists.

2010 in review

The stats helper monkeys at WordPress.com mulled over how this blog did in 2010, and here’s a high level summary of its overall blog health:

Healthy blog!

The Blog-Health-o-Meter™ reads This blog is on fire!.

Crunchy numbers

Featured image

The average container ship can carry about 4,500 containers. This blog was viewed about 20,000 times in 2010. If each view were a shipping container, your blog would have filled about 4 fully loaded ships.


In 2010, there were 8 new posts, growing the total archive of this blog to 32 posts. There were 19 pictures uploaded, taking up a total of 483kb. That’s about 2 pictures per month.

The busiest day of the year was February 5th with 153 views. The most popular post that day was Software Project Failure.

Where did they come from?

The top referring sites in 2010 were stackoverflow.com, blog.ysatech.com, smartclient.codeplex.com, forums.silverlight.net, and social.msdn.microsoft.com.

Some visitors came searching, mostly for wcf concurrencymode.

Attractions in 2010

These are the posts and pages that got the most views in 2010.

1

Software Project Failure February 2010

2

ClickOnce – Creating Publish Page from msbuild December 2009
11 comments

3

MSBuild and Multiple Environments December 2009
2 comments

4

Silverlight Communication Exception March 2009
17 comments

5

SVN Merge Without Conflicts March 2009
5 comments

WCF in Azure – Lessons Learned

Recently I’ve been trying to get my WCF services working in Azure, this post shares some lessons learned. Some of these lessons will likely be obvious for those of you familiar with hosting WCF services in IIS, however I personally haven’t written web sites for about 5 years so even if my memory served me well (which often it doesn’t) things have changed somewhat.

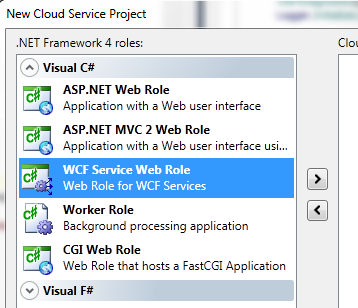
WebRole vs WorkerRole

Probably one of the first questions you will run into is ‘which role do I choose to run my services in?’

WebRole – Choose this if you want your services hosted in IIS
WorkerRole – Choose this if you want to spin up your own ServiceHost instances.

Before trying to make my services work in Azure I was hosting them in a simple Console app and was therefore creating my own ServiceHost instances. So at first I tried getting my existing code working in a WorkerRole.

I could make it work in the local devfabric but I couldn’t make it work in the cloud, the worker role seemed to start ok but the endpoints were not being exposed publicly, or maybe they failed to be created?

I’m still not sure why because I changed tactics and changed my services run in IIS. The main reason for this is I figure running the services in IIS will be more robust and will provide better reporting.

My change of tactics brought on the next problem…

Getting WebRole Working with Service implementation in Different Project

My service implementation code was in it’s own separate project, the service contracts were in another project as well. All WCF in Azure examples I found had the service, the contract and .svc in the WebRole. I wanted to keep my existing structure and it turned out to be very easy to do.

All that was needed was to put some .svc files (one for each endpoint) into the WebRole project and voila, endpoints available in the devfabric and in the cloud.

Contents of the .svc files….

<%@ ServiceHost Language="C#" Debug="true" Service="ServiceNamespace.ServiceName" %>

Easy!

Note that the .svc files must be in the root directory of the WebRole project as Azure does not have a concept of Virtual Directories.

Ports

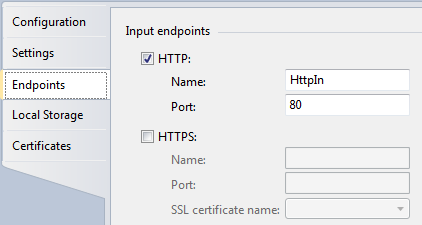
I still need to more play time to understand how this works more clearly. However what I did find is that if when I changed the port from 80 to 81 my endpoints were no longer visible in the cloud (they were visible in the devfabric).

Cloud Cover – Channel 9

I’d say this is an invaluable resource, lots of useful Azure info for developers….

Making Azure Services Available to Silverlight Clients

This is another thing that turned out to be quite simple.

To make any WCF service available to an SL client you must have a crossdomain.xml file. Normally you need to put this file in the IIS root directory, the way to do this for Azure is to simply drop the file into the root directory of the WebRole project.

Easy! Though I’d suggest host the services in ‘non-azure’ IIS and get it all working before switching to Azure. The crossdomain.xml thingy can be tricky, I’ve posted about wrestling with crossdomain.xml before.

Service Constructor

My web services were using an IoC container for various things and so the constructor of each service took a container. For an IIS hosted service you need to have a parameterless constructor so I had to make some semantic changes to the code to allow for this.

Summary

It took a bit of trial and error to get things working but overall I’d say most of the challenges I faced were more about my lack of knowledge rather than any real problems with Azure. I like it….and am looking forward to learning more 🙂

XAML Attribute Formatting

Is it just me or does the default setting for the XAML editor in Visual Studio make working with XAML more difficult?

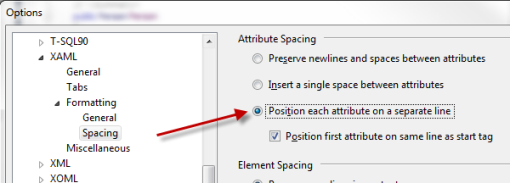
If you want to make your life easier, change the Tools->Options setting to ‘Position each attribute on a separate line’.

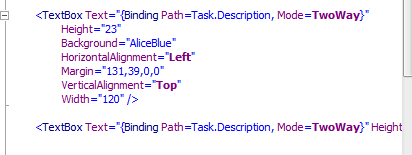
What difference does it make? As you can see, below are two text boxes with all of the same properties set….

No wait, you can only see the properties of one, to see the properties of the other one you need to scroll horizontally, no problem I’ll just use my mouses horizontal scroll wheel….

No wait, it doesn’t have one of those, only a vertical scroller. Damn those mouse makers!

In C# it is possible to create a new object and set all of its properties all on one mega long horizontal line, but we don’t. Why? Because the code is more readable when you break it up vertically over a few lines. You can see all of the properties at once and you usually don’t need to scroll…and if you do you have a vertical scroll wheel on the mouse 🙂

ClickOnce Master Build

Previously I have posted about how to publish a ClickOnce release for multiple environments. Whilst this works well there are two reasons (that I can think of) why it is not appropriate or good enough.

First, you or your manager may be a bit of a purist in terms of releasing to Production ‘exactly’ what has been tested, specifically the exact same compiled assemblies.

Second, you may need to create a release for several different customers who each have several of their own ‘environments’ but you do not want to provide them with your source code.

Third…both of the above. 🙂

When you ‘Publish’ with MsBuild it requires the source code and it recompiles your assemblies. So how can we easily create releases for multiple environments but only Publish once? This posting offers one solution which has worked for me in the past, it’s not a complete ‘how to’ guide I just wanted to cover the idea and problems I ran into along the way.

Master Build Environment

Make sure you take a look at my previous posting as this process builds on those ideas.

One of the final steps of this process is to re-sign the setup.exe, however in order for that final step to work you have to change one of your ClickOnce deployment settings in your .csproj file.

<SignManifests>false</SignManifests>

SignManifests must be false! Otherwise the signtool gets confused when re-signing the setup.exe. Check this out for a bit more info on this known issue.

So the first thing to do is create a BuildEnvironment called Master. The configuration details of this (web service addresses or database connnection strings etc) should point to nowhere, i.e. if someone deployed this build then it should not work. Publishing this is easy just follow the steps defined in the multiple environment posting, the process of creating a release with environment specific information that is tricky.

MsBuild Changes for Master Build Publish

When you publish with ClickOnce it creates a folder ‘Application Files’ where it puts the contents of the release. The space in that file name causes a problem with MAGE when re-signing the app. Now the only way I could see to change this was to cut and paste the _CopyFilesToPublishFolder target from Microsoft.Common.Targets and modifying the _DeploymentApplicationFolderName property in my version to remove the space. I think it is a really BAD idea to change the Microsoft.Common.Targets directly so that option was ruled out immediately and as you can see in the code below, Application Files (version below already has the space removed) is a hardcoded value, not a settable property…therefore even though it is ugly, cut and paste seems the only viable solution.

      <!--
	  This Target code has been cut and paste from Microsoft.Common.Targets.
	  Only ONE thing has been changed.
	  Application Files changed to ApplicationFiles (i.e. the space removed)
	  The only other way of changing that value is to modify Microsoft.Common.Targets
	  which is a really bad idea (would have to ensure this was changed on ALL machines.)

	  The space causes a problem when re-signing the app with MAGE
    ============================================================
                                        _CopyFilesToPublishFolder
    ============================================================
    -->
    <Target
        Name="_CopyFilesToPublishFolder">

        <!-- Compute name of application folder, which includes the assembly name plus formatted application version.
             The application version is formatted to use "_" in place of "." chars (i.e. "1_0_0_0" instead of "1.0.0.0").
             This is done because some servers misinterpret "." as a file extension. -->
        <FormatVersion Version="$(ApplicationVersion)" Revision="$(ApplicationRevision)" FormatType="Path">
            <Output TaskParameter="OutputVersion" PropertyName="_DeploymentApplicationVersionFragment"/>
        </FormatVersion>

        <PropertyGroup>
            <_DeploymentApplicationFolderName>ApplicationFiles\$(AssemblyName)_$(_DeploymentApplicationVersionFragment)</_DeploymentApplicationFolderName>
            <_DeploymentApplicationDir>$(PublishDir)$(_DeploymentApplicationFolderName)\</_DeploymentApplicationDir>
        </PropertyGroup>

        <!-- Copy files to publish folder -->
        <Copy
            SourceFiles=
                "@(_ApplicationManifestFinal);
                @(_DeploymentResolvedManifestEntryPoint);
                @(_DeploymentManifestFiles);
                @(ReferenceComWrappersToCopyLocal);
                @(ResolvedIsolatedComModules);
                @(_DeploymentLooseManifestFile)"
            DestinationFiles=
                "@(_ApplicationManifestFinal->'$(_DeploymentApplicationDir)%(TargetPath)');
                @(_DeploymentManifestEntryPoint->'$(_DeploymentApplicationDir)%(TargetPath)$(_DeploymentFileMappingExtension)');
                @(_DeploymentManifestFiles->'$(_DeploymentApplicationDir)%(TargetPath)$(_DeploymentFileMappingExtension)');
                @(ReferenceComWrappersToCopyLocal->'$(_DeploymentApplicationDir)%(FileName)%(Extension)$(_DeploymentFileMappingExtension)');
                @(ResolvedIsolatedComModules->'$(_DeploymentApplicationDir)%(FileName)%(Extension)$(_DeploymentFileMappingExtension)');
                @(_DeploymentLooseManifestFile->'$(_DeploymentApplicationDir)%(FileName)%(Extension)$(_DeploymentFileMappingExtension)')"
            SkipUnchangedFiles="true"
            OverwriteReadOnlyFiles="$(OverwriteReadOnlyFiles)"/>
        <Copy
            SourceFiles="@(_DeploymentManifestDependencies)"
            DestinationFiles="@(_DeploymentManifestDependencies->'$(_DeploymentApplicationDir)%(TargetPath)$(_DeploymentFileMappingExtension)')"
            SkipUnchangedFiles="true"
            OverwriteReadOnlyFiles="$(OverwriteReadOnlyFiles)"
            Condition="'%(_DeploymentManifestDependencies.DependencyType)'=='Install'"/>
        <Copy
            SourceFiles="@(_ReferenceScatterPaths)"
            DestinationFiles="@(_ReferenceScatterPaths->'$(_DeploymentApplicationDir)%(Filename)%(Extension)$(_DeploymentFileMappingExtension)')"
            SkipUnchangedFiles="true"
            OverwriteReadOnlyFiles="$(OverwriteReadOnlyFiles)"/>
        <FormatUrl InputUrl="$(_DeploymentApplicationUrl)">
            <Output TaskParameter="OutputUrl" PropertyName="_DeploymentFormattedApplicationUrl"/>
        </FormatUrl>
        <FormatUrl InputUrl="$(_DeploymentComponentsUrl)">
            <Output TaskParameter="OutputUrl" PropertyName="_DeploymentFormattedComponentsUrl"/>
        </FormatUrl>
    </Target>

Note that the space only causes a problem with MAGE.exe, it does not cause a problem with MAGEUI.exe! MAGEUI.exe happily re-signs the release even with the space in the directory name. We cannot use MAGEUI.exe however because this process needs to be automated, if you use MAGEUI.exe someone has to run it and manually set the values…not good enough.

It took a while to figure out that the space in the dir name was causing a problem so I hope this saves someone else some time…

Creating a Release

Ok so now we have a published build that no one can use, the first place we want to release to will be QA, then from there UAT so what we need now is an automated way of creating a release configured for these environments.

Creating a release should be as easy as publishing a build, it should be a one step process.

Create a batch file ‘createRelease.bat’ which performs all of the necessary steps. Those steps are:

  1. Create or clean the ‘working’ directory.
  2. Copy the master build into the working directory.
  3. Run the MsBuild steps.
  4. Create a zip file of the new release. (not necessary just makes it a little easier to move the releases around)

Run the MsBuild Steps

Add a new target in your customized.targets file, ModifyMasterBuildForEnvironment.

<Target Name="ModifyMasterBuildForEnvironment" DependsOnTargets="SetPropertyValues; ConfigureForEnvironment; RecreateManifests" />

SetPropertyValues

There are a few properties which need to be set for the resigning process.

	<Target Name="SetPropertyValues" >
		<Message Text="FullReleasePath $(FullReleasePath)" />

		<MSBuild.ExtensionPack.Framework.TextString TaskAction="Replace" OldString="$(ApplicationVersion)" OldValue="." NewValue="_">
			<Output PropertyName="buildX" TaskParameter="NewString"/>
		</MSBuild.ExtensionPack.Framework.TextString>

		<PropertyGroup>
			<WorkingDirectory>WorkingDirectory</WorkingDirectory>
			<FullReleasePath>$(WorkingDirectory)\ApplicationFiles\$(AssemblyName)_$(buildX)</FullReleasePath>
			<ApplicationManifestName>$(AssemblyName).exe.manifest</ApplicationManifestName>
			<ApplicationManifestPath>$(FullReleasePath)\$(ApplicationManifestName)</ApplicationManifestPath>
			<DeploymentManifestPath>$(WorkingDirectory)\$(DeploymentManifestName)</DeploymentManifestPath>
			<CertFileName>cert\pmsKey.pfx</CertFileName>
			<ProviderFullUrl>$(ProviderBaseUrl)$(DeploymentManifestName)</ProviderFullUrl>
		</PropertyGroup>
	</Target>

ConfigureForEnvironment

Add your own target(s) here that does the work to configure the release for a given environment. e.g. update the config file setting database connection strings or web service urls.

RecreateManifests

Now that you have modified the published release it is no longer a valid ClickOnce release. Try to install it and it will fail. What you need to do is update and re-sign the manifests (the Application Manifest and the Deployment Manifest). You also need to update and resign the Setup.exe!

	<Target Name="RecreateManifests">

		<!-- Application manifest update and resign -->
		<Message Text="Removing .deploy suffix..." />
		<RenameFiles DirectoryPath="$(MSBuildProjectDirectory)\$(FullReleasePath)" RemoveSuffix=".deploy" IncludeSubDirectories="True" />
		<Message Text="Updating application manifest" />
		<Exec Command="mage -Update $(ApplicationManifestPath) -FromDirectory $(FullReleasePath) -ToFile $(ApplicationManifestPath)" />
		<Message Text="Adding .deploy suffix..." />
		<RenameFiles DirectoryPath="$(MSBuildProjectDirectory)\$(FullReleasePath)" AppendSuffix=".deploy" IncludeSubDirectories="True" ExcludedFiles="$(ApplicationManifestName)" />
		<Message Text="ApplicationManifestPath $(ApplicationManifestPath)" />
		<Exec Command="mage -Sign $(ApplicationManifestPath) -CertFile $(CertFileName)" />

		<!-- Deployment manifest update and resign -->
		<Message Text="Updating Deployment manifest (ProviderFullUrl=$(ProviderFullUrl))" />
		<Exec Command="mage -Update $(DeploymentManifestPath) -AppManifest $(ApplicationManifestPath) -ProviderUrl $(ProviderFullUrl)" />
		<Message Text="DeploymentManifestPath $(DeploymentManifestPath)" />
		<Exec Command="mage -Sign $(DeploymentManifestPath) -CertFile $(CertFileName) " />

		<!-- Setup.exe update and resign -->
		<Message Text="Updating $(WorkingDirectory)\Setup.exe..." />
		<Exec Command="$(WorkingDirectory)\Setup.exe /url=$(ProviderBaseUrl)" />
		<Message Text="Signing $(WorkingDirectory)\Setup.exe..." />
		<Exec Command="signtool sign /v /f $(CertFileName) $(WorkingDirectory)\Setup.exe" />

	</Target>

Note that before Updating the Application Manifest we have to remove the .deploy extension from the file names, then add the .deploy extension back onto the file names before Signing. (if you have configured ClickOnce to NOT append .deploy then obviously just remove these steps).

RenameFiles Task

To get the renaming behaviour I wanted I had to create my own MsBuild task. You will need to do the same, it’s a little crude as I had limited time but this is the simple little task I created….

    public class RenameFiles : Task
    {
        public override bool Execute()
        {
            var directory = new DirectoryInfo(DirectoryPath);
            if(directory == null)
                throw new ApplicationException(string.Format("Directory path is invalid: {0}", DirectoryPath));
            Console.WriteLine(string.Format("DirectoryPath:{0}", DirectoryPath));

            ProcessDirectory(directory);

            return true;
        }

        private void ProcessDirectory(DirectoryInfo directory)
        {
            RenameAllFiles(directory);
            if(! IncludeSubDirectories)
                return;

            var subs = directory.GetDirectories();
            foreach (DirectoryInfo sub in subs)
                ProcessDirectory(sub);
        }

        private void RenameAllFiles(DirectoryInfo directory)
        {
            var files = directory.GetFiles();

            if(files.Length == 0)
                return;

            foreach (FileInfo file in files)
            {
                string fileName = file.Name;
                if (ExcludedFileList.Exists(name => name.Equals(fileName, StringComparison.InvariantCultureIgnoreCase)))
                {
                    Console.WriteLine(string.Format("{0} is excluded from renaming.", file.Name));
                    continue;
                }
                Console.WriteLine(string.Format("Renaming {0}", file.Name));
                RemoveExtensions(file);
                AppendExtensions(file);
            }
        }

        private void RemoveExtensions(FileInfo file)
        {
            if (string.IsNullOrEmpty(RemoveSuffix))
                return;
            file.MoveTo(file.FullName.Replace(RemoveSuffix, string.Empty));
        }

        private void AppendExtensions(FileInfo file)
        {
            if (string.IsNullOrEmpty(AppendSuffix))
                return;
            file.MoveTo(string.Format("{0}{1}", file.FullName, AppendSuffix));
        }

        public string DirectoryPath { get; set; }
        public string RemoveSuffix { get; set; }
        public string AppendSuffix { get; set; }
        public string ExcludedFiles { get; set; }
        public bool IncludeSubDirectories { get; set; }

        private List<string> ExcludedFileList
        {
            get
            {
                if (excludedFileList == null)
                    excludedFileList = CommonFunctions.CreateListFromCommaSeparatedString(ExcludedFiles);
                return excludedFileList;
            }
        }
        private List<string> excludedFileList;
    }

Summary

There are a number of other little steps we do to make this release process work here but these are really specific to how we want it to work. What I have outlined above is the core steps involved including some problems you will face and their solutions. I hope this posting helps you get over the most challenging of the hurdles you will face in setting a smooth ‘Master Build’ release process but there is still alot of extra steps you will need to create yourself to get it working end to end.

One thing I would recommend is, once you have a working createRelease.bat (note it doesn’t have to be a batch file, could be an exe or powershell or whatever works best in your situation) then create a createReleaseALL.bat file. In there make n calls to createRelease.bat…one for each environment you need to create releases for. That way if you have a dozen environments you can still create a release for all of them with a one step process 🙂

I have had to do this fairly quickly so if something is not clear please let me know and I will see if I can improve the post over time.

Final note – It does take time to set this up and get it working correctly, but it is so worth it! Over time you will save much more time than you spent setting it up, guaranteed!

Additional Resources

A few links which helped me to piece this puzzle together…

ClickOnce with bootstraper setup.exe need to change URL without any build

packaging-a-clickonce-server-deployment
Batch File Error

Weird Characters Causing Batch File Error

is not recognized as an internal or external command, operable program or batch file

That’s the error I was getting, weird considering the only thing (after removing everything else) in the file was @ECHO OFF. The ‘weird’ characters are shown in the little snippet below

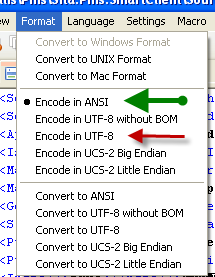
After a bit of head scratching I opened notepad++, switched on ‘Show all characters’…nothing strange there. I had seen this before but I can never remember….then I did! Remember that is, the problem was the file, when it was created (by visual studio…as a txt file), was created with UTF-8 encoding, needs to be ANSI for batch files (or at least it can’t be UTF-8).

Green indicates ‘good’ encoding for batch files, red bad.

With notepad++ you can see what the encoding is (under Format) and change it. I changed my batch file to ANSI and voila it works!

I’ve blogged it so I can remember next time 🙂